Teachers, it’s here! The new Erin Condren Teacher Lesson Planner has launched, and you’re going to LOVE the special new feature they’ve introduced this year! Here’s your first look at all the new accessories and this year’s planner.

This post is part of a partnership with Erin Condren, but my thoughts and opinions about the products are mine. I don’t promote what I don’t love! This post includes affiliate links for which I may make a small commission at no extra cost to you should you make a purchase.
New Erin Condren Teacher Accessories for 2024
Like most years, Erin Condren is featuring several new accessories in the teacher line this year.
The acrylic 8-compartment organizer just might be my favorite! It pairs perfectly with the new planning sticky notes 8-pack and is ideal for a Post-It hoarder like me! I love the colors and the different headers on these sticky notes. They’ll be ideal to use in my planner throughout the year.

Writing tools are my top picks for any EC order I place! These teacher dual-tip markers have a chisel tip and a bold tip. The colors are fantastic, as always, and they are perfect for subject headings in the new planner. I also love these designer gel pens with their fine tip. They will be ideal for planning spaces.

Another new writing tool for this launch is this set of 8 cute and colorful square highlighters. Their chisel tip will be great for highlighting important events and deadlines in my planner this year.

The Erin Condren sticker packages never disappoint. With a mix of bright colors and foil accents, these have stickers for various uses, including both functional and decorative. This “Too Cool For School” sticker book has 12 sheets and over 500 stickers!

There are two new snap-in dashboards this year. The one on the left is the teacher’s universal snap-in to-do list dashboard and has spaces for “copies,” “grade,” and “contact” notes on one side and “to do” and “looking ahead” spaces on the back. The dashboard on the right is the teacher snap-in dashboard with spaces for the days of the week and before and after school on the front and a blank 2×3 grid on the back for extra notes. These can be used with wet-erase markers.

Finally, I received the bound teacher record book in the same colorful “Evolve” theme as my planner. This 108-page record book has a sewn-stitch binding with the same top-quality paper you’ve come to expect from EC planners. Inside are pages for important dates and class schedules, graph pages, 48 checklist pages to track marks and assignments, and 48 lined pages for meeting notes or planning.

New Erin Condren Teacher Lesson Planner
Drum roll, please…! This is the moment I know you’ve been waiting for! Once again, I’ve chosen a colorful planner for the upcoming school year. This new EttaVee design is called “Evolve,” and it is gorgeous! The colors are vibrant, and there are hints of gold foil accents.
This year, one additional accessory is available to pair with your planner! This large clear planner folio is available in two colors, with a clear PVC cover and vegan leather exterior. It has two button closure options and two pockets in the back. It fits any of the 8.5″ x 11″ monthly planners and teacher planners.

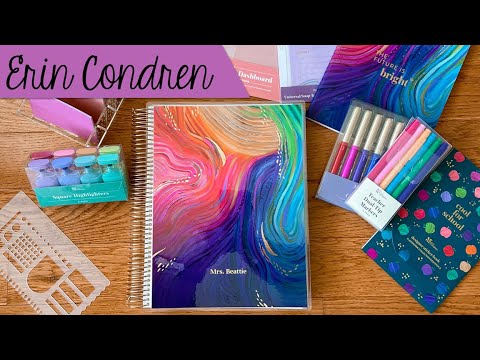
Teacher Planner Walkthrough Video
Take a look at my page-by-page walkthrough of the new EC Teacher Planner for 2024. There is a new layout this year that I’m THRILLED about! Click the image below to watch:
How to Get Yours
⭐ If you’re a first-time Erin Condren customer, you can use this link to become an EC Insider and save on your first order.
⭐ If you’ve shopped with Erin Condren before, set a reminder on your phone for May 7 and place that order right here!!
Have questions about this launch? Contact me here!
You might also be interested in this post:
Save this post for later: